Certainly! Here's the rewritten content:
---
Welcome back to the blog today! We're thrilled to have Lisa joining us again from the Advisors Circle. She’s here to share her latest project—her Weekend Getaway Blouse with Hemstitching, the Chai Tee Dress and Tunic, and her Heirloom Afternoon Tea Blouse Tutorial. Thank you so much for sharing these fantastic tutorials with us, Lisa!
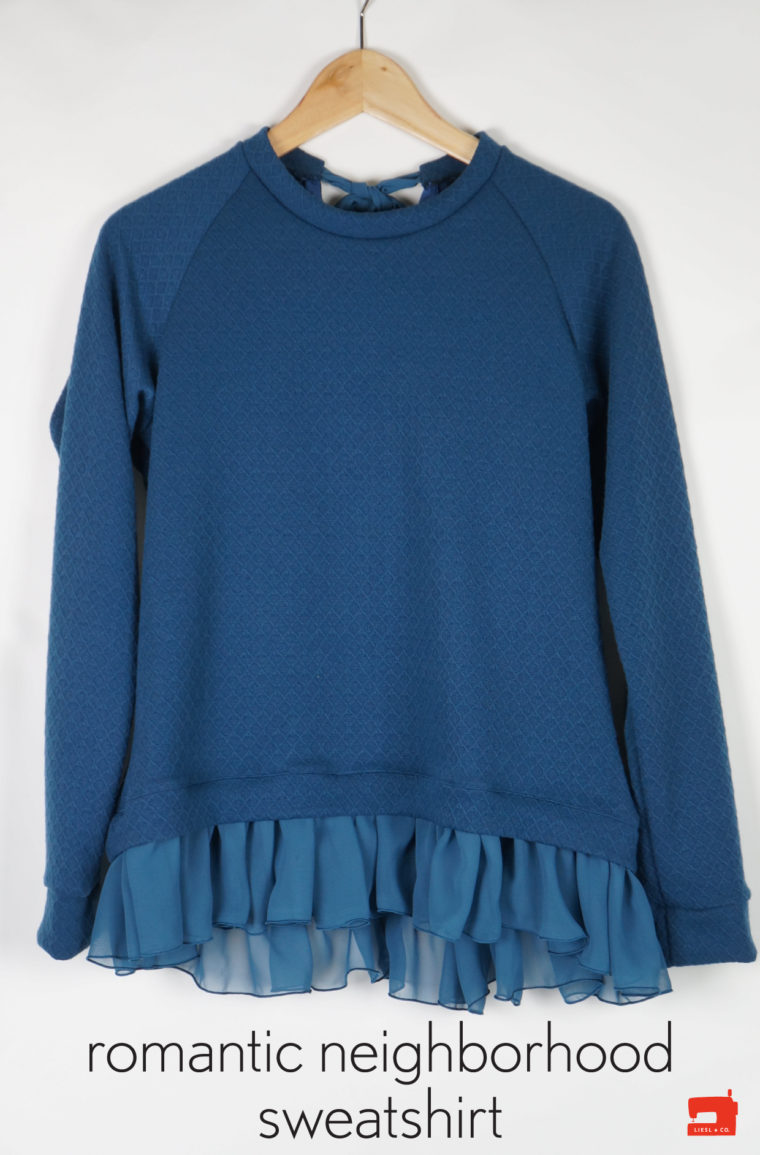
When it comes to sewing projects that can truly transform your wardrobe, certain patterns stand out as absolute must-haves. The Liesl + Co. Neighborhood Sweatshirt is one of those patterns. It offers endless possibilities with its multiple style lines and variations. From contrasting fabrics to lace sleeves and faux suede accents, there's something for everyone. For my version, I wanted to go all-out romantic for my daughter, so I added a chiffon ruffle and a back bow.
The base of my sweatshirt uses the View B body paired with the View A sleeve. I chose a lightweight sweatshirt knit for the main fabric. For the chiffon ruffle and bow, I used 1/2 yard of 45-inch-wide chiffon. To tailor the fit, I shortened the pattern body by 1 inch at the lengthen/shorten line and reduced the waistband width by the same amount to accommodate the ruffle. At the center back, I cut a "V" shape that was 4 inches deep and 1 inch wide. I softened the sharpness of the "V" by rounding the bottom slightly to allow room for the bow knot.
To finish off the "V" opening, I used bias binding or a strip of lightweight jersey fabric. Pressing one side of the bias binding flat, I pinned it to the right side of the back with the raw edges aligned, stretching the "V" open and extending the binding beyond the edges. Stitching along the pressed line as a guide, I turned the bias to the wrong side and pinned it securely in place.
Next, I stitched along the edge of the bias binding, trimming the excess bias fabric flush with the top of the sweatshirt. For the bow, I cut two strips of chiffon, each 3 inches wide and the full width of the fabric. After sewing the short ends together with right sides facing, I joined the long sides in the same manner. Turning the ties right-side out, I used my serger to achieve clean, professional-looking results. Alternatively, French seams would work beautifully here too. I attached the short raw edges of the ties to the bottom half of the neckband, ensuring they stayed outside the seam allowance.
To form the bow, I pleated the ties to fit snugly into the bottom half of the neckband and basted them in place. Folding the neckband in half with the long sides together, I sewed the short ends closed. Turning the band right-side out, I attached it to the neckline of the sweatshirt, starting and ending at the "V," being careful not to catch the bow ties. Following the pattern instructions, I pressed the neckband to the wrong side and topstitched the seam for added security.
For the ruffle, I cut three strips of chiffon, each 6 inches wide and the full width of the fabric. Joining the strips at the short ends with right sides together, I created one continuous long strip. Using the rolled-edge setting on my serger, I finished the bottom edge of the chiffon. Gathering the top edge to match the length of the waist seam of the sweatshirt, I stitched the remaining short ends together to form a circular ruffle. Sewing the gathered ruffle to the seam connecting the sweatshirt body and waistband completed the transformation.
If you’re looking for an alternative touch, consider adding a tulle ruffle instead of chiffon for a completely different aesthetic. For more inspiration, check out our Tulle Hem Tutorial.
Thanks again, Lisa, for sharing your creativity and expertise with us! Your projects always bring a touch of elegance and charm to any wardrobe.
---
This version maintains the original message while expanding on the details and providing a more conversational tone.
Knot Yarn,Fluffy Chenille Yarn,Short Eyelash Yarn,Polyester Popular Yarn
ZHANGJIAGANG WELLHOW TRADING CO., LTD. , https://www.wellhowyarn.com